Tuesday, September 18, 2012

Nursery (#3) Reveal!

I was planning on revealing William's new bedroom first, but since it's still not finished, I'm gonna jump ahead to Boychild #3's nursery. I'll do my best to point out where I got things, and how I did things as I go through the pictures. 


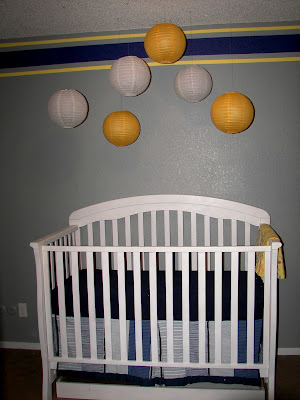
Welcome to Eli's room. This is the view from the door. The paint color is Valspar's Vintage Grey, and I'm pretty much in love with it. It's just deep enough to be manly and soothing without making it feel like the room is closing in on you. To the right, is the crib.


As you can see, I didn't go with a particular theme this time like I did with the other two boys. I decided to just go with good boy colors and then the room can grow with whoever ends up in here without me having to repaint. They can add pictures and things of whatever their current interests are at the time to make it more their own. 

The crib I found on Craigslist for a whopping $40, including the mattress. I lucked out on this one not only because of the ridiculously good price, but also because it was almost exactly what I was looking for. The Chinese lanterns I got at Party City for a few bucks each. (The yellow ones are actually more yellow and less orange.) 


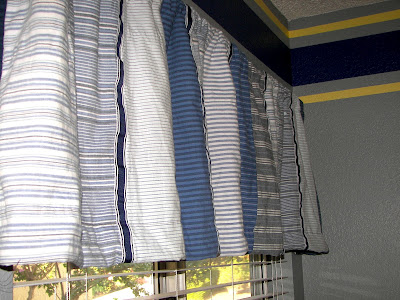
I made the sheets and the crib skirt. I didn't have to buy anything for either. I made two crib sheets out of the top sheet that came with our jersey sheet set for our queen sized bed. We never use flat sheets, so I figured since it was the right color, I may as well put it to good use. The bonus is that it matches the other two kid's rooms too. The crib skirt I made from our old shower curtain that we received when we got married. It had some bleach stains and stuff on it so I'd replaced it in our bathroom, but I kept it around thinking that it was a heck of a lot of fabric that I might be able to use some day. 


I was also able to get a matching window valance out of it.


The left side of the room is the closet/changing station. Since the room isn't what anyone would call large, I decided this time around to utilize the double closet that we don't use to put the dresser/changing table in. It also gave me an excuse to do some very boy-like stripes to brighten up the grey a little bit. 

The changing pad cover I made out of a towel I found at Kohls. It was the right color, and it was on sale for $3.99. I bought two and made two covers for the price of one of the most inexpensive covers you can buy in a store. The little yellow pacifier bowl I found last week at Target on clearance for $2.50. 

The dresser I found on Craigslist for $30. It looked nothing at all like it does now when we brought it home. It used to be white and have a desk attached to it. When I got it into the closet in its original state, the right set of drawers wouldn't open because there was a wall in the way. I could've left it alone and found another place to put it, but I really wanted the extra space that having it in the closet would give me. It took me about a minute to go grab my circular saw and perform a desk amputation. That brought the problem of the molding. There was corner molding around the whole top of it- except for where I'd cut off the desk. Off to Lowe's I went to get some new molding to put around it. I decided to dress it up a little bit and made it a little thicker and more interesting. I ended up with some cheapo door casing topped off with some quarter round at the top. I also picked up some 2x3/8 craft wood to add to the drawer faces to give them a little more dimension. The drawer handles used to be shiny brass, so I grabbed some oil-rubbed bronze spray paint for those. Then came the paint. I had the nice, and very patient, lady in the Lowe's paint department custom mix the paint for it. I told her I wanted the tone of the Vintage Grey, but darker. She worked her magic, and two tries later she gave me the color I had in mind. 4 days later, I had everything mitered, attached, caulked, primed, and painted. It takes awhile to do these things with two little boys running around.


The inside of the drawers I lined with contact paper that I found on sale at Target, and I painted the sides of the drawers with the same yellow paint that's on the walls. The crate came from William's old nursery and I just repainted it the same color as the dresser.


The picture frames I got at the .99 store for, duh, .99 each. The animal silhouettes I printed off the computer and then cut out scrapbook paper that I already had, attached it to card stock that I already had, and stuck those suckers in the frames.


Last but not least is his name. I sprung for the actual wooden letters this time since he's only got 3 letters in his name. William got stuck with cardboard. They're the 13" letters from Hobby Lobby for $2 each that I covered with scrapbook paper. I did have to buy the scrap book paper for these. I bought extra, which was good 'cause I definitely used it, and spent about $3.


Thursday, June 21, 2012

Noah's Room

As most of you probably know, I'm 5 months pregnant with Boychild #3. Because of this, William will be moving into what used to be our craft/music/spare room, and Baby will be getting William's old room. William's current room is much closer to our bedroom, and also farther away from the other two, making it easier for me to stumble in there in the middle of the night, and harder for Baby to wake up the two older boys. I knew I wanted to paint William's new room just for him, and I'd never really done anything with Noah's room, so this was my chance. Baby #3's room is also going to be painted, but after William has moved out. Noah's "new room" as he calls it, is done for now except for a new light fixture that I'm going to make for him. I'm sure I'll continue keep adding things and tweaking it after that, but the majority is done. 


Noah's room started as pretty much a nothing. Poor kid had the only room in the house with white walls, and ended up with leftover curtains that didn't go anywhere else. Here you can see, all in one non-camera-phone picture, the wall color, curtains, and his little reading corner. (There's supposed to be a little Noah-sized rocking chair in the corner, but William took it somewhere to climb on.) The IMAGINE letters are fabric-covered cardboard. Cardboard came from a box that was lying around, and the fabric was left over from previous projects. They didn't cost me anything except for some time and glue-gun burns. The curtains are actually shower curtains because regular curtains are just so not fun. I wanted fun. Besides that, you get twice the amount of fabric for the same price and we have massive windows.


To the right is the changing table, (Yes, unfortunately, we still have a changing table in his room. We're working on it. Slowly.) and his frames that are supposed to have 5 Yo Gabba Gabba characters in them, but somebody keeps on figuring out new ways to take them down and pull the pictures out. I found the frames unfinished at Michaels for a few bucks each and spray painted with a can of $1 ReStore paint. I found the Gabba Gabba pictures online and printed them off. The bright orange hamper I found the other day at Ross. There really isn't orange anywhere else in his room except for in the picture above it, but I figured it's a bright color, so it'd work, right? Right.


I painted and put up three clipboards for him to display his artwork. I originally wanted a bulletin board, but quickly realized that with William around, thumbtacks would be dangerous. Would William us them to cause puncture wounds first, or eat first? 

His closet is my favorite-est. This was actually the last thing to get finished. The green is the leftover paint from what will be William's room in a few weeks. We're lucky enough to have a 4 bedroom house, but having 4 bedrooms in a house that was in our price range means that we don't have the largest bedrooms in the world. Because of this, I put his dresser in the closet. There's plenty of room to not have it in the closet, but he just has more room to actually play in his room if the dresser is out of the way. Since it's in the closet, that means that the closet door is opened, and left open a lot. I hated looking in there and seeing those white walls that screamed "UNFINISHED!!!" at me everyday. I've wanted to try stripes somewhere for a while now, and this was my chance. It's a small space, so it wouldn't take forever, and if I failed miserably it wouldn't take much time or money to fix it. Thankfully, they came out beeeeea-U-ti-fully. 


 Look at that there perfectly straight and level stripe. On stupid California textured walls too, I might add. This tape technique works amazingly well, especially if you use the green Frog Tape. When it comes to painting I may or may not turn into Crazy Crazy Painting Lady. Don't worry, I don't subject those around me to my craziness- it's in inward kind of crazy. I'm a perfectionist anyways, but it really comes out when it comes to painting. For example, I do graphic design every once in awhile, to make things for around the house, and also to make a little bit of extra money on the side, and I was literally thinking as I was doing a few painting touch-ups "I just need to fix this pixel right here...." Except for the back striped wall, the rest are the blue that is the rest of this room.  

William's new room is next in line to be decorated, but it's gonna be a few weeks. We have the grandparents coming in from out of town so they'll be staying in the spare room, but after that it'll be time to move William over so that he can get comfortable with his new room before Baby comes. 

Thursday, February 16, 2012

The Writing on the Wall

Last fall I started re-decorating our bedroom. A couple of friends saw this and asked if I'd painted it. I think my answer was something like, "Psh, no! The wall is textured! How crazy do you think I am?!" Well, apparently they were right about my levels of sanity. Actually, they were overstating my sanity levels.


Our church recently moved into a new building and we're in the process of painting verses on the wall. The way they've been doing it, using a projector to project the image up on the wall, trace, and paint, I've known about for a long time in the back of my mind, but dismissed it because who has a projector at their beck and call? Because of my husband's job (of the last 5 years, I might add), he has access to a projector that they've been using. So yeah, I've come to find out that I am in fact, one of those  people that has a projector at their beck and call, and have been for the last 5 years. Or at least, a husband at her beck and call who can get her a projector. 


Photo Credit
 I came across this quote on Pinterest, adjusted it slightly for our family, projected it up on the wall, and went to town. Two weeks and several degrading remarks about textured walls later, it was finished. It probably wouldn't have taken as long to do it if I weren't setting everything down every five minutes to get a small dark-haired boy untangled from cables 
behind the tv....


This is the finished project. I love it.


This is what was there before, but because of doors slamming on the other side of the wall, they always ended up crooked....or a tall person would walk a little too close to the wall as they were turning the corner to go down the hallway and knock one (or two) off the wall. The pictures have now moved to their new home in the hallway, and one has yet to be knocked down. (Yay!)

Monday, January 23, 2012

UPDATE: How Grey's Anatomy Saved My Baby. Theoretically.

Not theoretically....and make that babies. TWO days after I anchored these to the wall I took this picture.


Friday, January 20, 2012

How Grey's Anatomy Saved My Baby. Theoretically.

I apologize in advance for the terrible pictures. I decided at the last minute of my little project that this would make a good blog post, but I didn't want to wait for the camera battery to charge.

This whole thing started because I may or may not have a slight addiction to Grey's Anatomy. I jumped on the band wagon about oh, seven years after the rest of the world did, but that's usually how it goes with me and the new-fangled moving picture box stories. Yesterday I was watching Grey's, and the episode was about Bailey's son, who is about the same age as my William, climbing up a bookcase, and knocking it over on himself. This caused severe internal injuries. It thoroughly freaked me out because I was having visions of little William doing the exact same thing. He is definitely a climber, and is 1, and a little boy, and is a little dumb when it comes to knowing what will and what won't hurt him. He's also my kid, and I'm a little special that way too...even though I'm not 1. Or a little boy. After seeing this episode I decided that something must be done.


I stopped at Osh on my way to the gym and went to the child safety section to get one of the furniture tie down thingies that I'd seen before. I found these, but I wasn't impressed. It said something about on the back about not leaving the child unsupervised in the room wherever you're using this, and that just isn't very realistic around here. I wanted something that made the bookshelves rather stuck. Besides, these were about $6 bucks, and I needed 6 of them. I then headed to the hardware section, because I had a better idea. I picked up a couple of  boxes or  corner brackets ( 8 for $5), and some dry wall anchors that will hold up to 50lbs. This morning I secured those suckers to the wall.


We have two bookshelves next to each other, so this is showing the inside corners of them. I put one of these on each corner. I'm pretty sure I could climb up those things and they wouldn't go anywhere, so if William tries something, he'd be more likely to break a shelf in half than to pull the whole thing down on him.


I have stuff on top of the bookcases anyways, so you can't even tell that they're there. I feel much better now knowing that I won't have a real-life Grey's Anatomy episode in my living room.


Thursday, November 24, 2011

New Brahm Family Tradition

Happy Thanksgiving everyone!

Yesterday I decided that I wanted cinnamon rolls for breakfast on Thanksgiving. I'm thinkin' new tradition. I mean, my kids might not actually be mine if they didn't like cinnamon rolls. I'm a fat kid at heart. Really, I am. After my spur of the moment Brahm Family Tradition making, I started scouring the internet for an amazing recipe. Well, I found it, so here I am, after eating my second one, (See, told you- fat kid.) to share the yumminess with you all. I found this recipe, and really only decided on this one because I was curious about the whole potato thing. I mean really, who puts potatoes in cinnamon rolls? Apparently I do. Always. Forever and ever I will put potatoes in my cinnamon rolls. Next time I'm thinking of trying more of a cream cheese type frosting, but the frosting (or glaze, whatever) in this recipe is just peachy. (Or sugary, really.)

Classic Cinnamon Rolls


Ingredients

  • Rolls:
  • 1 cup mashed potatoes
  • 1 cup reserved potato water
  • 3/4 cup butter OR margarine
  • 3/4 cup sugar
  • 2 teaspoons salt
  • 1 cup hot water
  • 2 envelopes Fleishmann's® Active Dry Yeast
  • 1/2 cup warm water (100 to 110 degrees F)
  • 2 eggs
  • 8 1/2 cups all-purpose flour, or more if needed
  •  
  • Filling:
  • 1/2 cup butter OR margarine, softened
  • 1 cup sugar
  • 1 1/2 teaspoons Spice Islands® Ground Saigon Cinnamon
  •  
  • Icing:
  • 3 cups powdered sugar
  • 6 tablespoons butter OR margarine, softened
  • 1 teaspoon Spice Islands® 100% Pure Bourbon Vanilla Extract
  • 5 tablespoons milk, or more as needed

Directions

  1. Combine potatoes, potato water, butter, sugar, salt and hot water in large mixing bowl. Stir until butter melts; set aside and let cool. Combine yeast and 1/2 cup warm water in small bowl. Let rest 5 minutes. Add eggs, 2 cups flour and yeast mixture to potato mixture. Beat until well mixed. Continue adding flour, 1 cup at a time until soft dough forms.
  2. Knead on a lightly floured surface until smooth and elastic (about 4 to 6 minutes), OR knead with electric mixer using dough hook. Place in a greased bowl, turning to coat. Cover.
  3. Let rise in a warm, draft free area about 1 hour, until doubled in size. Punch dough down; divide in half.
  4. Roll one portion of dough on a lightly floured surface to a 12 x 18-inch rectangle. Spread with half the butter. Combine sugar and cinnamon; sprinkle half of the mixture over surface. Roll up tightly lengthwise, sealing edges. Cut into 12 slices. Place in greased 13 x 9-inch pan. Repeat with remaining dough. Cover.
  5. Let rise 30 to 45 minutes until nearly doubled.
  6. Bake in preheated 350 degrees F oven for 25 to 30 minutes.
  7. Cool for 15 minutes. Combine icing ingredients and drizzle over rolls.
  8. Makes 24 rolls.

Footnotes

  • 2 medium potatoes yield about 1 cup mashed potatoes.

Nutritional Information open nutritional information

Amount Per Serving  Calories: 404 | Total Fat: 13.5g | Cholesterol: 51mg

Monday, November 7, 2011

Entry re-do. Or really just "Entry Do."

Since we moved into our house a year ago, I've been wanting to do something with our entryway. You know, like make it look like an actual entryway and not just a short hallway with a door at the end? Plan A was to do board and batten, but I couldn't get away with just doing the batten and painting it white since our walls are textured and that would just look weird. Plan B was beadboard, which I still might do someday, but I wanted something cheaper and easier for now.

A couple weeks ago The Lovely Neighbor Jan and I went to Urban Salvage in downtown Fresno, which is by the way, my new favorite place, and along with a few other things, some of which I have no idea what I'm going to do with, I picked up two sets of shutters. I've been looking for old (cheap) shutters for a year. These, were $2 a pair. SCORE! After bringing them home, I decided that I finally knew what I wanted to do with the entry. Turns out, that one pair of shutters matched the height of an old window I had sitting in a closet. The window used to be in our guest bathroom, but I'd replaced it with something else a little while ago. I painted the window a cream color with some $2 ReStore paint from my paint stash, and then used a dark walnut glaze over it to age it a little bit. The bottom pane used to be a mirror, and the top was just a regular window, but I wanted something a little more functional for an entry so I put the mirror on top, and painted the bottom glass with chalkboard paint. I'd planned on not doing anything with the shutters, but after I got them up, they just didn't look right, so I dry brushed them with some of the leftover grey/blue paint from our bedroom.


The coat hooks I made out of some scrap wood I had in the garage that had come off of a pallet I'd found in a dumpster. In the process of making these I learned how to put in a new blade on a circular saw, and how to use a circular saw. I am woman, hear me roar. Again, I painted them with ReStore paint from my stash. The actual coat hooks I picked up from Lowes for $4 a piece. They're in the doorknob aisle, in case you're ever looking for them. Took me about 20 minutes to figure that one out. Fun fact: The hooks in the bathroom aisle cost 3 times as much as the hooks in the doorknob aisle. (Ok, not fun fact. Just an irritating fact.)


I saw a picture somewhere on Pretty Handy Girl's blog of some similar coat hooks that she'd made and adapted it to what would work for us. Her version had a lot more scrap pieces of wood put together with several hooks. I wanted ours to frame the window, and also have some hooks low enough for the kids to reach by themselves, so I made four individual coat hooks.


The garland came from my bookshelf. I think I've finally found a permanent home for that thing. At least until I decorate for Christmas...


The "Family" thing I found on Pinterest. Well, sort of. They used yarn, I used twine, 'cause I just love twine.


I wish I had a before picture of the entry, but really, there was nothing, so just close your eyes and pretend like the inside of your eyelids are a light grey/blue color, and you'll get the idea.