Showing posts with label decorating. Show all posts

Monday, November 7, 2011

Entry re-do. Or really just "Entry Do."

Since we moved into our house a year ago, I've been wanting to do something with our entryway. You know, like make it look like an actual entryway and not just a short hallway with a door at the end? Plan A was to do board and batten, but I couldn't get away with just doing the batten and painting it white since our walls are textured and that would just look weird. Plan B was beadboard, which I still might do someday, but I wanted something cheaper and easier for now.

A couple weeks ago The Lovely Neighbor Jan and I went to Urban Salvage in downtown Fresno, which is by the way, my new favorite place, and along with a few other things, some of which I have no idea what I'm going to do with, I picked up two sets of shutters. I've been looking for old (cheap) shutters for a year. These, were $2 a pair. SCORE! After bringing them home, I decided that I finally knew what I wanted to do with the entry. Turns out, that one pair of shutters matched the height of an old window I had sitting in a closet. The window used to be in our guest bathroom, but I'd replaced it with something else a little while ago. I painted the window a cream color with some $2 ReStore paint from my paint stash, and then used a dark walnut glaze over it to age it a little bit. The bottom pane used to be a mirror, and the top was just a regular window, but I wanted something a little more functional for an entry so I put the mirror on top, and painted the bottom glass with chalkboard paint. I'd planned on not doing anything with the shutters, but after I got them up, they just didn't look right, so I dry brushed them with some of the leftover grey/blue paint from our bedroom.


The coat hooks I made out of some scrap wood I had in the garage that had come off of a pallet I'd found in a dumpster. In the process of making these I learned how to put in a new blade on a circular saw, and how to use a circular saw. I am woman, hear me roar. Again, I painted them with ReStore paint from my stash. The actual coat hooks I picked up from Lowes for $4 a piece. They're in the doorknob aisle, in case you're ever looking for them. Took me about 20 minutes to figure that one out. Fun fact: The hooks in the bathroom aisle cost 3 times as much as the hooks in the doorknob aisle. (Ok, not fun fact. Just an irritating fact.)


I saw a picture somewhere on Pretty Handy Girl's blog of some similar coat hooks that she'd made and adapted it to what would work for us. Her version had a lot more scrap pieces of wood put together with several hooks. I wanted ours to frame the window, and also have some hooks low enough for the kids to reach by themselves, so I made four individual coat hooks.


The garland came from my bookshelf. I think I've finally found a permanent home for that thing. At least until I decorate for Christmas...


The "Family" thing I found on Pinterest. Well, sort of. They used yarn, I used twine, 'cause I just love twine.


I wish I had a before picture of the entry, but really, there was nothing, so just close your eyes and pretend like the inside of your eyelids are a light grey/blue color, and you'll get the idea.

Tuesday, July 26, 2011

Cheapest Wall "Art" Ever.


Once again, I kinda forgot that I had a blog when I went to start this project, and didn't take a before picture. Oh well, just imagine a bunch of empty space above our couch. It shouldn't be that hard, if you have just a teensy bit of imagination.

All five of you that follow my pinterest probably saw me pin something similar to this a little while ago. That was actually the same day that I did this little project, but I've been putting off taking pictures of it. All two of them. What are those little things on the wall, you ask? (Hopefully you're just thinking it, and not actually asking out loud, because that would be just a little weird. Not that I don't talk to myself a daily (minutely) basis, but I'm just sayin'....a little weird.)


Those little flower shaped objects are made out of coffee filters, and paper towels....dipped in coffee. Lots of coffee was involved, as was a little cutting, twisting, and taping.


The big splurge on this project was the double stick tape, which I already had, so I guess it wasn't really a splurge. It was a splurge for another project, but I didn't end up using any of it. Oh well, maybe it was fate. The decor gods just knew I was going to want to attach a paper towel to a wall in the near future. Yep, that's it.


Thursday, July 21, 2011

New Fruit Bowl


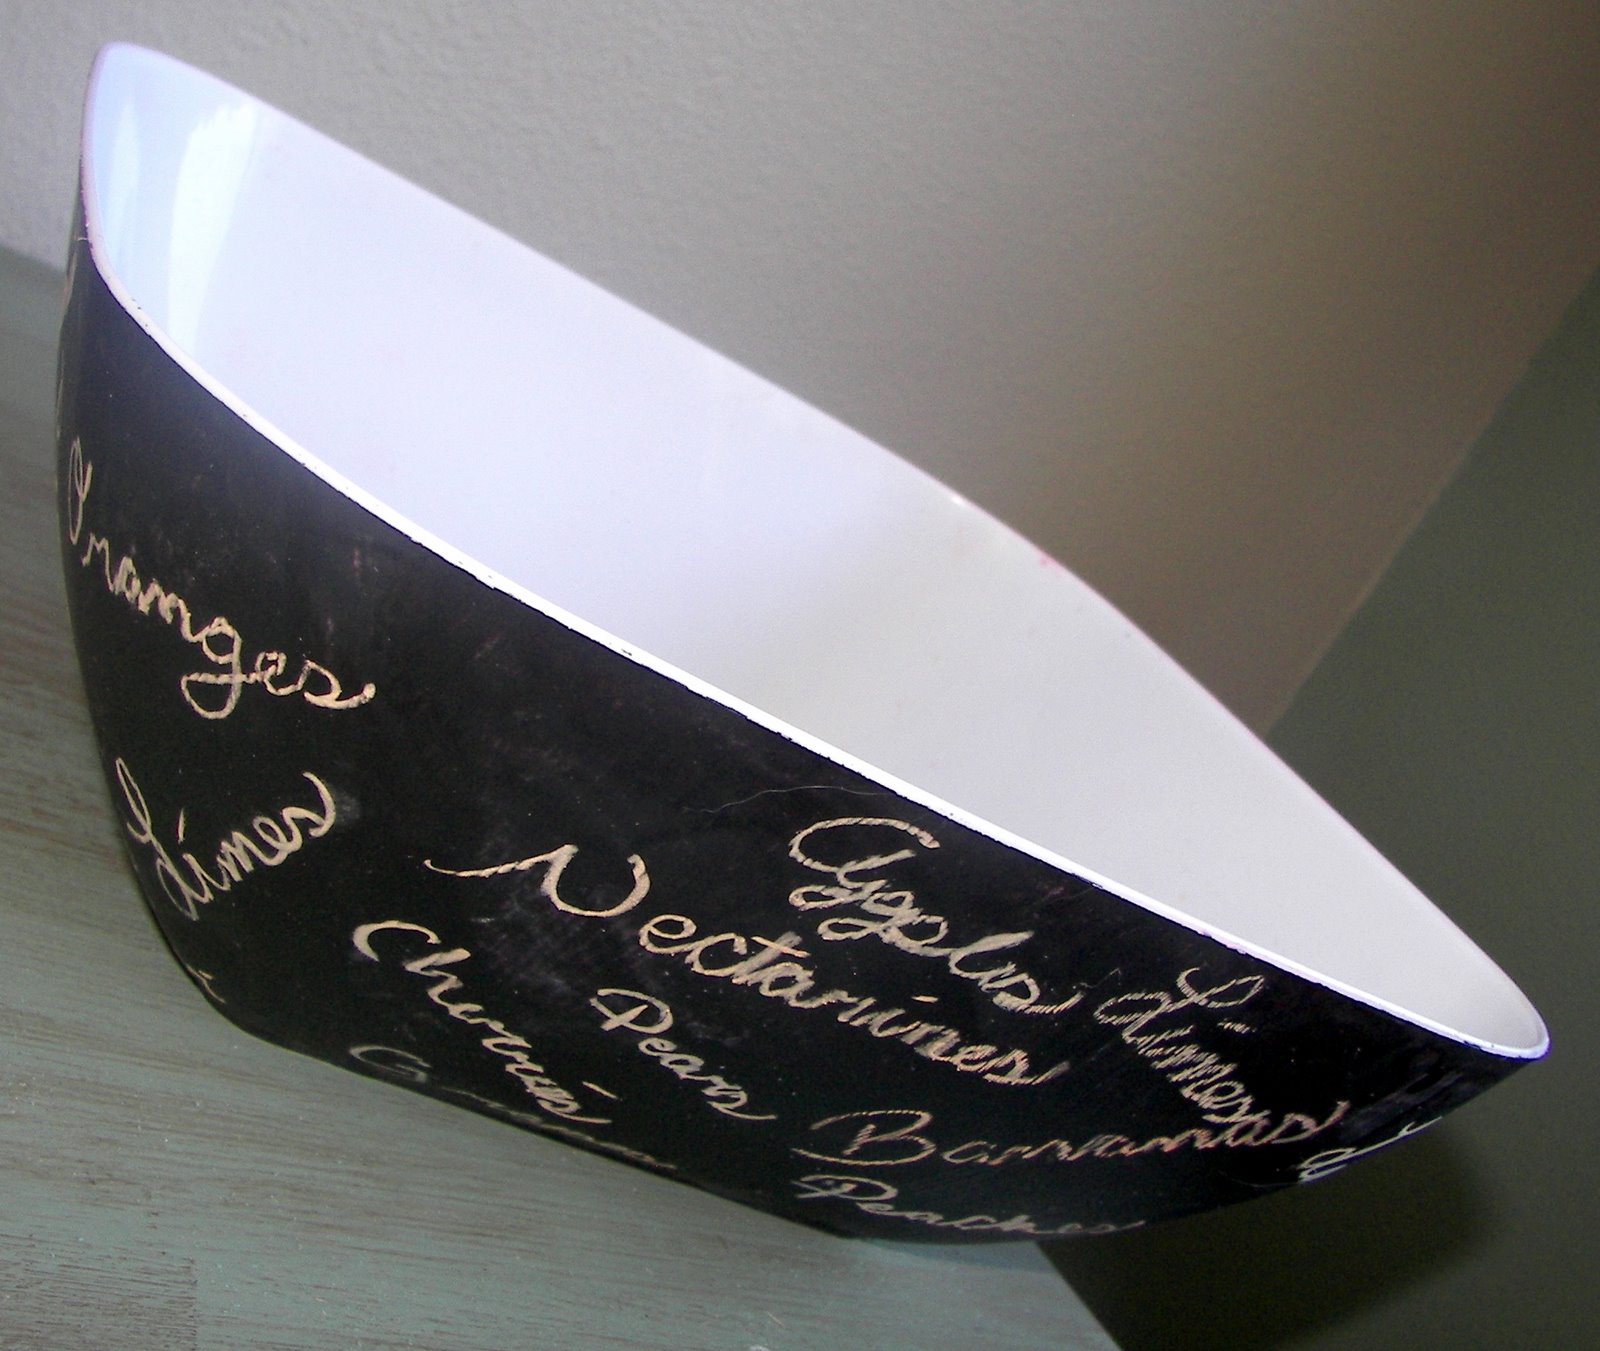
I live a block away from a Target. Problem with living a block away from a Target is that anytime you need a little something, you can just walk (or drive, who are we kidding) over to Target to pick up whatever you need, and of course a little extra, because it's Target. A week ago I needed to get diapers for a baby, or pickles, or maybe it was a light bulb, who knows, but whatever it was, instead of going straight to the light bulb aisle, I had to go check out the "value section," 'cause I'm all about the values. There, sitting up on the top shelf, was this bowl. Well, not JUST this bowl, there were several of them, but this bowl was lucky enough to get to come home with me and get a makeover. Upon arriving to it's new home, it got a couple coats of chalkboard paint on it, and someday, will get some fruit in it. (Why am I getting flashbacks to lessons about prepositions?) After I talk myself into going to the grocery store, or the farmers market, or somewhere that has fruit, we'll actually get to that last step, but for the moment, all of the fruit is in the freezer, and it would probably get pretty messy if I took all that out to put in my new bowl. First of all, because it's a heck of a lot of fruit, and also, because frozen fruit is always messy when it's thawed out, which is why I make smoothies out of it, and don't ever actually thaw it out. Since this post was supposed to be about my new fruit bowl, and not about my fruit thawing habits, I think it's time for me to stop typing. It's also time to stop typing because my two-year-old is eyeing my big glass of iced coffee, and that would be bad if he decided to partake.

Tuesday, July 19, 2011

Tour Of Our Bookshelves


I think I mentioned in a previous post that I recently moved our living room. The 100+ degree summer temperatures were heating up our old living room, and the air conditioner just wasn't cutting it. Probably has something to do with those vaulted ceilings, or maybe it's the giant windows, or maybe the SINGLE VENT. No, that couldn't be it. Anyways, a few weeks ago I decided that I'd had it up to here with the heat, and moved the living room into the room that we hadn't really done anything with. Our house is an older house, and has what I think is supposed to be a family room, and a den. Our plan was to turn the extra room into a music room someday, but since we can't afford to buy a piano right now, it was just sitting empty. Except for a drum set. The drum set has been moved, by the way. Someday I'll take pictures of that, (the living room, not the drum set,) but you don't want to see it right now, trust me. All 3 Brahm men have been sick this week, so it's pretty much a disaster area in there. I'll only let family see it like this. And single men, 'cause they probably won't notice anyways.

Someone had given us two white bookshelves, and they were sitting in the "I-Don't-Know Room," keeping the drums company. Since the drums moved, I had to figure out what to do with the shelves. After trying about, oh, I don't know, 5 different furniture arrangements over a couple of days, they ended up against one wall, pushed up against each other. For the very first time, I actually put a little bit of *drumroll* effort into "styling" *gasp* the bookshelves, like the cool kids do. *jazz hands* I even have my books facing the wrong way. Cool Kid Click, here I come! ....and now it is time for your guided tour. Keep you hands and arms inside the boat at all times, and watch out for the ducks- they bite.


The big picture.


My little papertowel pom-pom garland thingy. Iced coffee was involved. No, not for drinking, silly. Although, I'm pretty sure I was drinking some at the time too, so never mind.


Hello, my name is Hannah, and I have a problem- I raid my kids' toyboxes for decor fodder. Yep, I did. I wandered the house looking for wood-like things, and then a diaper needed to be changed and I saw the alphabet puzzle on the shelf of the changing table. The one that Noah has NEVER done. So, I took it. *hangs head* ...it gets worse. After changing the diaper, I went back out to the now living room, and found the dog chewing on a train track. A wooden train track. I took it away. And kept it. And then attached the puzzle pieces to it. *shuffles away* Cute though, isn't it?


This is my wedding bouquet. It looked a little less dry at the time. The tiara I wore on our wedding day is sitting on top of them. That is about the same dryness now as it was on our wedding day. Although, it did rain on Wedding Day, so never mind.


Yes, more train tracks, and a porcelain shoe Josh brought back for me from Holland many moons ago when we were dating.


I bought this frame for our first anniversary, and just now put a picture in it. Oh well. More train tracks, a vase from the dollar section at Target, more letters and half a wooden goat.


I really am shameless with the train tracks, aren't I? More letters, an "N" for Noah, and a "W" for William, or as Josh said, "Oh, I thought it said 'now,'"a tea tin, a half-burned candle, and a rooster. I wasn't lying when I said I had a problem.


One of my favorite pictures of Noah from right before his 1st birthday, and the wooden Noah Train, courtesy of Bella and Grandpa.


Pictures of Noah's little life, (yes, we do, in fact, have two kids, but Noah's just been around a lot longer, hence more pictures,) and our wedding album.

And, that's all folks! Hope you enjoyed your tour! (And avoided the ducks)

Monday, July 18, 2011

Chalk boards, cupboard doors, same thing


Today I have a before and after, but only because I managed to find a "before" picture from awhile ago. It's not like I was patient enough to take a picture of the "before" so you really just got lucky on this one.


The point of this picture, is the big empty space on the far wall. I'm not a fan of empty spaces, but that's not the problem. See that shiny rectangle on the left side of the wall? That's a phone jack. The phone jack that wouldn't be a problem if I could put a phone there. You know, if there were a power outlet anywhere remotely close to the phone jack that I could plug said phone in to. I'm telling you, I'm not sure the designers of this house were all there. After oh, 5 months of living here, I came up with a solution. Something had to cover it up, and also lie flat against the wall so that you wouldn't know that something was being covered up and, whatever was put there, would have to span most of the wall since it's not like it would look normal to just put something over the phone jack. If I did that, someone would probably think, "hey, I wonder what that picture is covering up, and try to look under it or something. Here is my solution-


I headed over to the Habitat ReStore and picked up some cupboard doors, put some chalkboard paint on them, drilled some holes to put some twine through, and hung those suckers up. Noah loves to color on them, so he gets to have his pictures hung up in the dining room.


See, no more phone jack! (Or empty wall.)

Friday, July 15, 2011

Once upon a time, my husband got me coffee...

Once upon a time while riding in the car, I was very very thirsty. I begged and pleaded (ok, so maybe I just mentioned to) my dear husband to pull over and find me liquid. Preferably, cold liquid since the temperature was likely over 100 degrees since this is the central CA valley. In JULY. Anyways, back to my story. My dear husband did indeed pull the car over, and since when he asked me what I wanted I just said "surprise me," it was entirely up to him to decide what I would like best. Well, he knows me well, and returned with a Starbucks Mocha Frappaccino thingy. I think I downed the thing within a minute or so, (except for the couple sips that I saved for him) and then started looking at my empty bottle, and thought about how it must cost them a little more to make a glass bottle than a plastic one...and how that's pretty nice of them, because I, for one, like glass bottles better than plastic bottles- They just feel better. ....and then I thought about how it kinda looked like a giant baby food jar....and how people use baby food jars to store spices in (I promise, there's a point to all this), and how I should do that too, once I start buying baby food for William....and how I had a few big bags of spices that I bought in bulk at Winco, like cinnamon, and cayenne ('cause I use a lot of that to cook with), and ground mustard. At that very moment, right after the ground mustard thought, I knew what I was going to do with my glass bottle- It was going to be a cinnamon shaker.
You see,when my mom made coffee when I was a teenager she'd occasionally sprinkle a little bit of cinnamon on top of the grounds before brewing it. I always make it like that now, and so for the longest time, I've just had a very ugly bottle of ground cinnamon sitting next to my coffee pot, so that Josh, when he makes my coffee for me in the mornings, doesn't have to go looking for it.


I took a hammer and nail and stuck a few holes in the top, and wha-la. Now I have a pretty cinnamon shaker, with the Starbucks logo on the lid, that just so happens to match the logo that's on my Starbucks coffee cup-shaped coffee canister. It all just matches so well!You know you want to try it.... ;)

Friday, June 17, 2011

Before and After


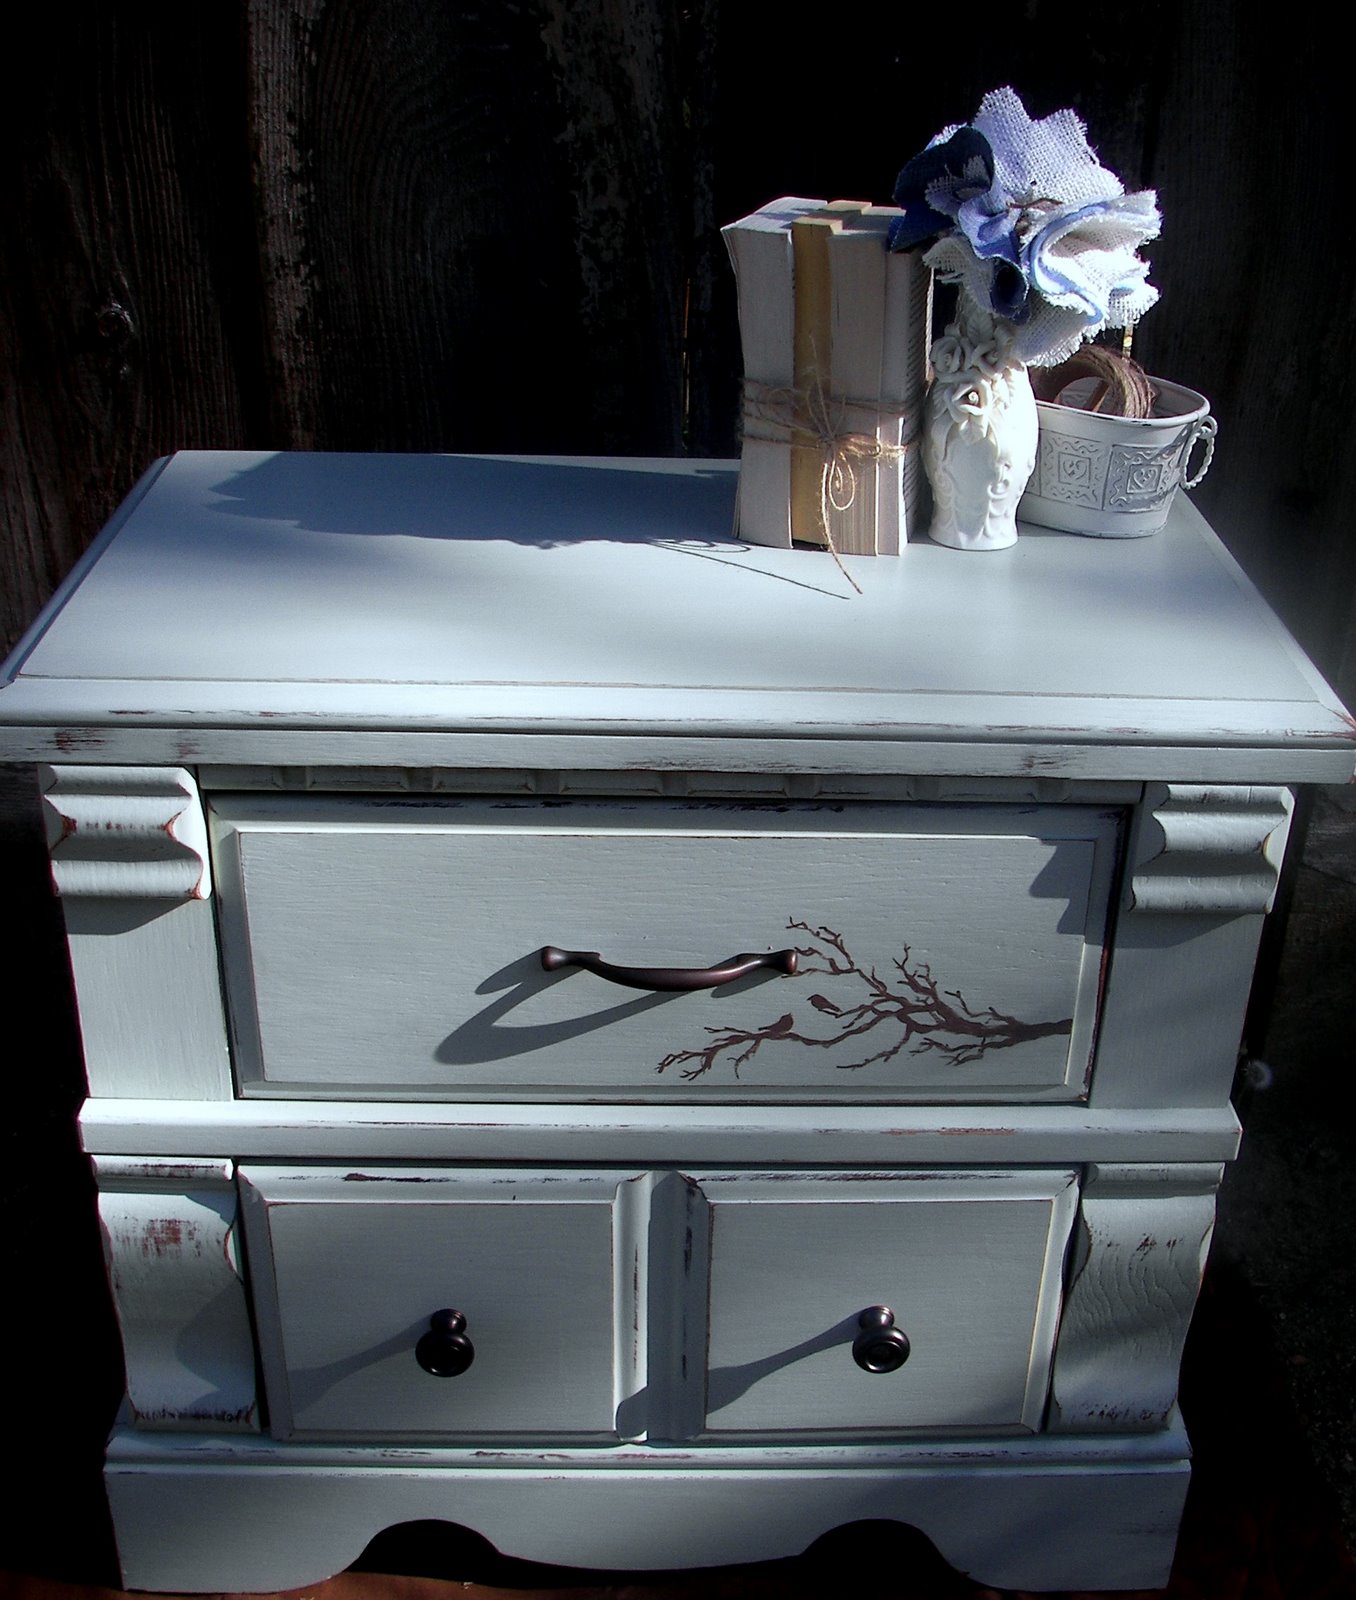
This is the end table I mentioned way back here. I really thought I would have it done before now. Guess I was wrong. Woops. Anyways, it's been painted, received a "something pretty," distressed, and polyurethaned. That's a word, right? Eh, probably not. Here's the after.


This end table/night stand is currently for sale here, and here. Let me know if you're interested!


Friday, May 13, 2011

Yes....no...maybe?....meh. (A project I'm not sure about.).


A few days ago a friend mentioned how she liked to make things out of books. I too like that whole concept, but have never really done anything about it. So, off I went to browse Pinterest to find something for future crafty endeavors. Sure enough, I found something, and I knew exactly where I wanted to put it. Problem is, now that it's done, I'm not sure I like it. I know the husband doesn't like it, but I didn't really expect him to. That's fine though - he pretty much lets me do what I want, unless it's antiquing the kitchen cabinets. I think that part of the problem with this project is that I didn't have any hot glue sticks. I have the gun, but no sticks. I even took the oldest boy-child and walked over to Target to see if I could get some there, but couldn't find any. (We did manage to find an orange slushie and potato chips, though.) All of that to say, the way it is, I kinda expect it to fall apart at any moment. At least it won't hurt anyone if it does.

The place I had in mind for this project was above our fireplace. You see, when we bought the house there was dark wood paneling. That was quickly painted over, and now it's a cream color. Problem is, there's a BIG open space between the top of the fireplace and our vaulted ceiling. It needs something. So, now I have a "something." Too bad I'm not sure if I like it.

So, without further adieu, my wreath-


There it is. Meh. I'm not exactly sure why it doesn't quite float my boat. There's nothing really wrong with it, I'm just not all that happy with it. But there it hangs, at least until I find something I like better. It only cost me about $3 so it's not the end of the world if I don't keep it up for long, right?


Monday, May 9, 2011

My dumpster shelf


This picture was the inspiration. I came across it while I was wasting time on Pinterest. Funny thing about Pinterest- I waste time on it only to give myself more to do. Anyways, I saw this and loved the whole pallet shelf idea. I don't exactly have plates to put on something like this, but I like the concept. Besides that, I wanted it in my bathroom, and the bathroom would be a funny place to put plates. Just sayin'.


It just so happened that a couple weeks ago I was taking the trash out at church, and lo and behold, a pallet was sitting there right on top of all the trash. It was like it was there waiting for me. The only thing missing was the light shining down on it from the heavens. I believe my exact exclamation at this moment was "Hot dog!" which was when my two-year-old little boy wanted to know where the hot dog was. It rode around in the back of our van for a little while, and then this last week, I decided it was time to take my saw to it....and hammer....and drill....and paintbrush. My plan was for it to replace the picture in our bathroom that really doesn't fit with the rest of the decor. I put the picture there in the first place because the spot looked empty, it sorta matched, and I didn't have anything else.


(This picture is also before my mirror was framed.)
After some cutting in half, and rearranging of my pallet, I had myself a brand new (sort of) shelf.


As usual, I wanted a little "something pretty" on my shelf, but went in a little different direction than usual. Instead of painting something, I decided to use one of my favorite things: burlap. (I'll take burlap over raindrops on roses any day.) As far as the stuff on the shelf, I'm not in love, but it's what I have, so it'll have to do for now. Maybe next week I'll find something I like more....in the dumpster.


I just kinda made up the flowers as I went. I've seen flowers made from burlap before, so I wasn't completely winging it, but I hadn't really found a tutorial of something that I liked, so I just kinda...went with the flow. After I was done making them, I decided that the edges just blended into each other, so I put some dark brown paint on the edges of the "petals" to make them stand out a little more. They're not attached to the shelf permanently, so I can always take them off whenever, like say, after spring/summer and replace them with something else later.


Saturday, April 30, 2011

No more icky mirror


This is my bathroom.


This is the ugly spot on my mirror. I don't know how it got this way, I just know that this is how it was when we bought the house. I got so excited when I found this. That is, until I saw the $250 price tag. No thank you-I'd rather look at my ugly mirror. Then I saw this blog post over at {Show & Tell}. (It's a great blog, and since finding this particular post I've subscribed.) I decided that THIS was how I was going to fix my problem. So, off I went to pick out something to use for my framing. I decided on some door/window casing, because is was the width I wanted, but mostly because it was on clearance. I'm a sucker for clearance.

My mirror is held up with these

Which are big, and ugly, and hard to cover up without some major filing of the casing. My first idea was to attach my mirror to the wall with mirror glue, but the guy at the big home improvement store that we'll call Lowes, told me that if I wanted to keep my face, I shouldn't glue it to the wall. So, after coming home and thinking about it for a little while (there were a few days there when Josh would ask me what I was thinking and I'd answer "the bathroom.") and I went back to the store we'll call Lowes and bought these-


These are also mirror clips, but they are much flatter mirror clips, made even more flat by the filing I did to the little decorative raised part. Don't worry, I didn't file it down paper thin or anything- I just got rid of the point on it so that I wouldn't have to file quite as deep into my casing. I attached these to the wall, and then took out my old honkin' clips. I can't say I was sad to see them go. In fact, I was rather ecstatic.

I patched and painted, and then it was off to use my saw for the very first time. YAY!


This is the maiden miter box voyage. I didn't even know what I miter box was before I set out on this project. I'm pretty sure it was love at first sight. I measured and cut my casing, and then it was time to paint.


I painted the first couple inches of the underside of my casing because you can see some of it reflecting in the mirror.

I did file the casing a little bit where the clips were behind it so that it would sit flat against the mirror, and then I painted the clips the same color as the wall, (Yes, I am that ghetto. Next thing you know I'll be using glue instead of nails.) and then used liquid nails type stuff that said it could be used on mirrors, and...


Tada! The finished product.


Goodbye 1978!


Meet my bathroom vanity. (Sorry about the shooting pain you're getting in your eyeball from seeing this graphic picture.) I don't even know where to start. It looks like at some point a previous owner tried to refinish them by staining them....only instead of brushing or wiping on the stain like a normal person, they just kinda threw it. Possibly with a spoon. It gets worse. As I was cleaning them I found grooves in the cabinet doors that I didn't know were there. Why? Because they were filled with goo. Not normal goo like Spackle, or caulking, goo like....like the goo you find in the back of your refrigerator. The drawer pulls....oh boy. Hello, 1970! Oh, and there was some sort of green "fun" stuck in them. The hinges...I'm not sure they qualify as hinges anymore.

I decided it was time to do something about this. The only reason I hadn't done anything about it before now was because I didn't know what color I wanted, and I sure don't want to re-paint them any more than I need to. It's a pain to paint cabinets. The day I decided, I went to get my paint, and the next day started painting.


Meet my new vanity. It's SO much better. No more stain spatters, no more goo, and no more 30-year-old drawer pulls with green fun. I love it. My mom had given me the drawer pulls and handles leftover from her kitchen remodel, so I didn't have to pay for those. I even have enough left over for our master bath. Score!

I decided to use handles on the drawers instead of the pulls like were on originally, so I had to patch the hole in the center of the drawer, and then drill new holes for the handles. I learned through that that you need to drill the holes BIGGER than the screws, and also that if the screws are too long and you try to screw them in farther than they're supposed to go, they'll start trying to come out the other side of the handles, and that's bad. (Thankfully I caught that before too much damage was done.) But hey, now I have the 1.25" screws that I need for the other bathroom, 'cause I'm willing to bet the the drawers are the same thickness in the master bathroom as they are in this one.

Someday I'd like to get new counters and faucet, but that day is a long way away.

In my next post, I'll show you all what I did to fix the uh...beauty mark in the mirror for only $12!


Thursday, April 28, 2011

A Boring Bench Made Pretty


Remember the bench that I mentioned here? Well, I finally got the thing finished. It's been sitting in our spare bedroom for a month or so, half done because I just haven't gotten around to finishing it. Partially because I wasn't quite sure what I wanted to do with it. I knew I wanted a "something pretty" on it, but didn't know what. A week or so ago, I decided, so then it was time to get her done.

This isn't a great "before picture," because well, it wasn't supposed to be a "before picture." It was meant to show our out-of-state family what our entryway looks like, but with the magic of the crop tool, it also works for a before picture of our bench.

The personality-less bench.

And now *drum roll please!*


All better. She (I can call it a "she" right?) is now full of personality.


My "something pretty."


Just had to put one in there of my little bench model. :)

She was painted with an "oops paint," the "something pretty" was done with paint I had left over from other projects, then glazed with an acrylic craft paint, sanded down with 60 grit sand paper, and once I get some, will be getting a coat of poly.

While doing this I decided that I really really like refinishing furniture. I like it to the point that's it's my preferred sanity saver when the kids are starting to make me feel a little nutty. So, I decided to open an etsy store and make a little bit of extra money by selling my pieces. I have an end table that I found on Craigslist yesterday waiting to be given a personality, so hopefully before too long, it'll be done and up for sale!