Saturday, April 30, 2011

No more icky mirror


This is my bathroom.


This is the ugly spot on my mirror. I don't know how it got this way, I just know that this is how it was when we bought the house. I got so excited when I found this. That is, until I saw the $250 price tag. No thank you-I'd rather look at my ugly mirror. Then I saw this blog post over at {Show & Tell}. (It's a great blog, and since finding this particular post I've subscribed.) I decided that THIS was how I was going to fix my problem. So, off I went to pick out something to use for my framing. I decided on some door/window casing, because is was the width I wanted, but mostly because it was on clearance. I'm a sucker for clearance.

My mirror is held up with these

Which are big, and ugly, and hard to cover up without some major filing of the casing. My first idea was to attach my mirror to the wall with mirror glue, but the guy at the big home improvement store that we'll call Lowes, told me that if I wanted to keep my face, I shouldn't glue it to the wall. So, after coming home and thinking about it for a little while (there were a few days there when Josh would ask me what I was thinking and I'd answer "the bathroom.") and I went back to the store we'll call Lowes and bought these-


These are also mirror clips, but they are much flatter mirror clips, made even more flat by the filing I did to the little decorative raised part. Don't worry, I didn't file it down paper thin or anything- I just got rid of the point on it so that I wouldn't have to file quite as deep into my casing. I attached these to the wall, and then took out my old honkin' clips. I can't say I was sad to see them go. In fact, I was rather ecstatic.

I patched and painted, and then it was off to use my saw for the very first time. YAY!


This is the maiden miter box voyage. I didn't even know what I miter box was before I set out on this project. I'm pretty sure it was love at first sight. I measured and cut my casing, and then it was time to paint.


I painted the first couple inches of the underside of my casing because you can see some of it reflecting in the mirror.

I did file the casing a little bit where the clips were behind it so that it would sit flat against the mirror, and then I painted the clips the same color as the wall, (Yes, I am that ghetto. Next thing you know I'll be using glue instead of nails.) and then used liquid nails type stuff that said it could be used on mirrors, and...


Tada! The finished product.


Goodbye 1978!


Meet my bathroom vanity. (Sorry about the shooting pain you're getting in your eyeball from seeing this graphic picture.) I don't even know where to start. It looks like at some point a previous owner tried to refinish them by staining them....only instead of brushing or wiping on the stain like a normal person, they just kinda threw it. Possibly with a spoon. It gets worse. As I was cleaning them I found grooves in the cabinet doors that I didn't know were there. Why? Because they were filled with goo. Not normal goo like Spackle, or caulking, goo like....like the goo you find in the back of your refrigerator. The drawer pulls....oh boy. Hello, 1970! Oh, and there was some sort of green "fun" stuck in them. The hinges...I'm not sure they qualify as hinges anymore.

I decided it was time to do something about this. The only reason I hadn't done anything about it before now was because I didn't know what color I wanted, and I sure don't want to re-paint them any more than I need to. It's a pain to paint cabinets. The day I decided, I went to get my paint, and the next day started painting.


Meet my new vanity. It's SO much better. No more stain spatters, no more goo, and no more 30-year-old drawer pulls with green fun. I love it. My mom had given me the drawer pulls and handles leftover from her kitchen remodel, so I didn't have to pay for those. I even have enough left over for our master bath. Score!

I decided to use handles on the drawers instead of the pulls like were on originally, so I had to patch the hole in the center of the drawer, and then drill new holes for the handles. I learned through that that you need to drill the holes BIGGER than the screws, and also that if the screws are too long and you try to screw them in farther than they're supposed to go, they'll start trying to come out the other side of the handles, and that's bad. (Thankfully I caught that before too much damage was done.) But hey, now I have the 1.25" screws that I need for the other bathroom, 'cause I'm willing to bet the the drawers are the same thickness in the master bathroom as they are in this one.

Someday I'd like to get new counters and faucet, but that day is a long way away.

In my next post, I'll show you all what I did to fix the uh...beauty mark in the mirror for only $12!


Thursday, April 28, 2011

A Boring Bench Made Pretty


Remember the bench that I mentioned here? Well, I finally got the thing finished. It's been sitting in our spare bedroom for a month or so, half done because I just haven't gotten around to finishing it. Partially because I wasn't quite sure what I wanted to do with it. I knew I wanted a "something pretty" on it, but didn't know what. A week or so ago, I decided, so then it was time to get her done.

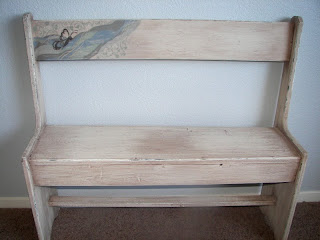
This isn't a great "before picture," because well, it wasn't supposed to be a "before picture." It was meant to show our out-of-state family what our entryway looks like, but with the magic of the crop tool, it also works for a before picture of our bench.

The personality-less bench.

And now *drum roll please!*


All better. She (I can call it a "she" right?) is now full of personality.


My "something pretty."


Just had to put one in there of my little bench model. :)

She was painted with an "oops paint," the "something pretty" was done with paint I had left over from other projects, then glazed with an acrylic craft paint, sanded down with 60 grit sand paper, and once I get some, will be getting a coat of poly.

While doing this I decided that I really really like refinishing furniture. I like it to the point that's it's my preferred sanity saver when the kids are starting to make me feel a little nutty. So, I decided to open an etsy store and make a little bit of extra money by selling my pieces. I have an end table that I found on Craigslist yesterday waiting to be given a personality, so hopefully before too long, it'll be done and up for sale!


Tuesday, April 12, 2011

Yummy (really healthy) Muffins

Two posts in one day....Woo wee!

Anyways, I'm on a weight loss kick to lose the rest of my baby weight, which means I'm doing my very bestest to eat well. It's not the easiest thing to get a decent breakfast around here, so my solution is to make muffins, so that I can just grab one, and be done with the whole breakfast thing. Well, except for my coffee. Gotta have my coffee. These are the muffins I made for the next few days. I'll put my changes in italics...there's a lot of them. Enjoy!

Original recipe from Allrecipe.com

Ingredients

  • 1 1/2 cups all-purpose flour (1 cup all-purpose flour)
  • 1/2 cup whole wheat flour (1 cup whole wheat flour)
  • 1 1/4 cups white sugar (1 1/4 cups brown sugar)
  • 1 tablespoon ground cinnamon
  • 2 teaspoons baking powder
  • 1/2 teaspoon baking soda
  • 1/2 teaspoon salt
  • 2 cups grated carrots
  • 1 apple - peeled, cored, and chopped (1 1/2 apples)
  • 1 cup raisins (golden raisins)
  • 1 egg
  • 2 egg whites
  • 1/2 cup apple butter (1 cup applesauce. Didn't have any apple butter, and didn't want to buy or make any.)
  • 1/4 cup vegetable oil (1/4 applesauce)
  • 1 tablespoon vanilla extract
  • 2 tablespoons chopped walnuts (didn't use any.)
  • 2 tablespoons toasted wheat germ (1/4 cup mixed into muffins instead of on top)

Directions

  1. Preheat oven to 375 degrees F (190 degrees C). Lightly oil 18 muffin cups, or coat with nonstick cooking spray.
  2. In a medium bowl, whisk together eggs, egg whites, apple butter, oil and vanilla.
  3. In a large bowl, stir together flours, sugar, cinnamon, baking powder, baking soda and salt. Stir in carrots, apples and raisins. Stir in apple butter mixture until just moistened. Spoon the batter into the prepared muffin cups, filling them about 3/4 full.
  4. In a small bowl, combine walnuts and wheat germ; sprinkle over the muffin tops.
  5. Bake at 375 degrees F (190 degrees C) for 15 to 20 minutes, or until the tops are golden and spring back when lightly pressed.

To those with a Winco near you!

A few days ago I went to Winco to buy the things that don't typically go on sale, like the hotdogs Josh likes, milk, spices, etc. Yes, I know milk goes on sale, but around here there's only one brand of milk. Josh has very sensitive taste buds when it comes to milk.

Anyways, I needed some spices for a new grilled chicken recipe (which I'll share once I've perfected it). I went to the spice aisle to grab the spices I needed, and then headed to the bulk food section. I knew they had spices over there, but wasn't sure exactly which spices they had.

Buying spices in bulk is SO much cheaper than not. The spice I needed, ground mustard, to buy it the normal McCormick way, was $2.63 for a teeny tiny little container. Buying it in the bulk food section, I got about 5 times as much for less than $.50. Woo hoo! I couldn't get rid of that little red-topped container fast enough. While I was over there I got a few other things I knew I was low on. I got a ton of cinnamon, the previously mentioned ground mustard, and a whole bunch of wheat germ, all for about $3. To buy the wheat germ by itself, in a container, is over $6, and I got SO much more for so much less moo-la. So, moral of the story, get your spices in the bulk food section at Winco. SO much cheaper!

Friday, April 8, 2011

Sweet Tea Season

Here in Central California, Sweet Tea Season comes early. It was 90 degrees here last week....in APRIL! The BEGINNING of April, no less. Back in my neck of the woods (Georgia), it doesn't get hot like that until a little later in the year. Granted, there's a butt-load (we're talkin' bubble butt-load) of humidity that comes with it, but nevermind that. So anyways, back to the topic at hand.

Sweet Tea Season is here. (Did I mention it was only April?) Well, at least for me- no one else around here drinks sweet tea. I am utterly alone in my Southern-ness. Up until last year, I made it like my mom always made it, but then I found a new and improved recipe, if you can call something so simple a recipe. Anyways, I thought I'd share. I know I have some sweet-tea drinkers reading, and if you aren't one of us, maybe you'll decide to be brave and indulge your inner Southerner. So, here it is-

  • 1 pinch baking soda
  • 2 cups boiling water
  • 6 tea bags
  • 1/2-1/3 cup white sugar
  • 6 cups cool water

Directions

  1. Sprinkle a pinch of baking soda into a 64-ounce, heat-proof, glass pitcher. Pour in boiling water, and add tea bags. Cover, and allow to steep for 15 minutes.
  2. Remove tea bags, and discard; stir in sugar until dissolved. Pour in cool water, then refrigerate until cold.


When I make it, I just boil some water in my tea kettle, and dump some into the pitcher. I don't bother measuring. Same thing with the cool water- I just fill my pitcher to just under half-way full. I say 1/2 to 1/3 sugar 'cause I like variety in my sweetness. The original recipe called for 3/4 cups, and that's just plain jelly-bean-like. Or should I say McDonalds-sweet-tea-like. Same thing, really. Last year I started trying to be just a tad bit healthier in my eating, and drinking, so I started using green tea. I still use regular black tea every once in awhile though, 'cause like I said, I like variety.