Showing posts with label bathroom. Show all posts

Monday, May 9, 2011

My dumpster shelf


This picture was the inspiration. I came across it while I was wasting time on Pinterest. Funny thing about Pinterest- I waste time on it only to give myself more to do. Anyways, I saw this and loved the whole pallet shelf idea. I don't exactly have plates to put on something like this, but I like the concept. Besides that, I wanted it in my bathroom, and the bathroom would be a funny place to put plates. Just sayin'.


It just so happened that a couple weeks ago I was taking the trash out at church, and lo and behold, a pallet was sitting there right on top of all the trash. It was like it was there waiting for me. The only thing missing was the light shining down on it from the heavens. I believe my exact exclamation at this moment was "Hot dog!" which was when my two-year-old little boy wanted to know where the hot dog was. It rode around in the back of our van for a little while, and then this last week, I decided it was time to take my saw to it....and hammer....and drill....and paintbrush. My plan was for it to replace the picture in our bathroom that really doesn't fit with the rest of the decor. I put the picture there in the first place because the spot looked empty, it sorta matched, and I didn't have anything else.


(This picture is also before my mirror was framed.)
After some cutting in half, and rearranging of my pallet, I had myself a brand new (sort of) shelf.


As usual, I wanted a little "something pretty" on my shelf, but went in a little different direction than usual. Instead of painting something, I decided to use one of my favorite things: burlap. (I'll take burlap over raindrops on roses any day.) As far as the stuff on the shelf, I'm not in love, but it's what I have, so it'll have to do for now. Maybe next week I'll find something I like more....in the dumpster.


I just kinda made up the flowers as I went. I've seen flowers made from burlap before, so I wasn't completely winging it, but I hadn't really found a tutorial of something that I liked, so I just kinda...went with the flow. After I was done making them, I decided that the edges just blended into each other, so I put some dark brown paint on the edges of the "petals" to make them stand out a little more. They're not attached to the shelf permanently, so I can always take them off whenever, like say, after spring/summer and replace them with something else later.


Saturday, April 30, 2011

No more icky mirror


This is my bathroom.


This is the ugly spot on my mirror. I don't know how it got this way, I just know that this is how it was when we bought the house. I got so excited when I found this. That is, until I saw the $250 price tag. No thank you-I'd rather look at my ugly mirror. Then I saw this blog post over at {Show & Tell}. (It's a great blog, and since finding this particular post I've subscribed.) I decided that THIS was how I was going to fix my problem. So, off I went to pick out something to use for my framing. I decided on some door/window casing, because is was the width I wanted, but mostly because it was on clearance. I'm a sucker for clearance.

My mirror is held up with these

Which are big, and ugly, and hard to cover up without some major filing of the casing. My first idea was to attach my mirror to the wall with mirror glue, but the guy at the big home improvement store that we'll call Lowes, told me that if I wanted to keep my face, I shouldn't glue it to the wall. So, after coming home and thinking about it for a little while (there were a few days there when Josh would ask me what I was thinking and I'd answer "the bathroom.") and I went back to the store we'll call Lowes and bought these-


These are also mirror clips, but they are much flatter mirror clips, made even more flat by the filing I did to the little decorative raised part. Don't worry, I didn't file it down paper thin or anything- I just got rid of the point on it so that I wouldn't have to file quite as deep into my casing. I attached these to the wall, and then took out my old honkin' clips. I can't say I was sad to see them go. In fact, I was rather ecstatic.

I patched and painted, and then it was off to use my saw for the very first time. YAY!


This is the maiden miter box voyage. I didn't even know what I miter box was before I set out on this project. I'm pretty sure it was love at first sight. I measured and cut my casing, and then it was time to paint.


I painted the first couple inches of the underside of my casing because you can see some of it reflecting in the mirror.

I did file the casing a little bit where the clips were behind it so that it would sit flat against the mirror, and then I painted the clips the same color as the wall, (Yes, I am that ghetto. Next thing you know I'll be using glue instead of nails.) and then used liquid nails type stuff that said it could be used on mirrors, and...


Tada! The finished product.


Goodbye 1978!


Meet my bathroom vanity. (Sorry about the shooting pain you're getting in your eyeball from seeing this graphic picture.) I don't even know where to start. It looks like at some point a previous owner tried to refinish them by staining them....only instead of brushing or wiping on the stain like a normal person, they just kinda threw it. Possibly with a spoon. It gets worse. As I was cleaning them I found grooves in the cabinet doors that I didn't know were there. Why? Because they were filled with goo. Not normal goo like Spackle, or caulking, goo like....like the goo you find in the back of your refrigerator. The drawer pulls....oh boy. Hello, 1970! Oh, and there was some sort of green "fun" stuck in them. The hinges...I'm not sure they qualify as hinges anymore.

I decided it was time to do something about this. The only reason I hadn't done anything about it before now was because I didn't know what color I wanted, and I sure don't want to re-paint them any more than I need to. It's a pain to paint cabinets. The day I decided, I went to get my paint, and the next day started painting.


Meet my new vanity. It's SO much better. No more stain spatters, no more goo, and no more 30-year-old drawer pulls with green fun. I love it. My mom had given me the drawer pulls and handles leftover from her kitchen remodel, so I didn't have to pay for those. I even have enough left over for our master bath. Score!

I decided to use handles on the drawers instead of the pulls like were on originally, so I had to patch the hole in the center of the drawer, and then drill new holes for the handles. I learned through that that you need to drill the holes BIGGER than the screws, and also that if the screws are too long and you try to screw them in farther than they're supposed to go, they'll start trying to come out the other side of the handles, and that's bad. (Thankfully I caught that before too much damage was done.) But hey, now I have the 1.25" screws that I need for the other bathroom, 'cause I'm willing to bet the the drawers are the same thickness in the master bathroom as they are in this one.

Someday I'd like to get new counters and faucet, but that day is a long way away.

In my next post, I'll show you all what I did to fix the uh...beauty mark in the mirror for only $12!


Monday, December 13, 2010

Dressing up a bathroom


I recently finished working on the first phase of "let's make a presentabe guest bathroom." Phase two, will include repainting the baseboards, which should be done soon, and repainting the cabinets under the sink. Not sure when that will get done. Someday I'll probably decide I want a new shower curtain and bath rug since the ones we have are stained with who-knows-what, but for now, it's what we have.

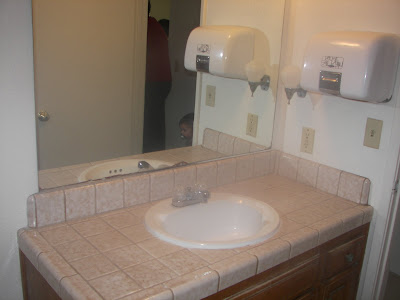
Here is the before picture-


Yes, that is an automatic hand dryer....and the old-school soap dispenser. I really have no words. I have no idea why that was there in the first place. There are so many strange things about this house that at this point I just kinda go with it. Anyways, both of those little gems had to go. As cool as it is to say that "my house has a hand dryer," I think I'm perfectly content to say "my house USED to have a hand dryer." The hand dryer now resides with our friend Andrew who took it down for me. For some reason he wanted it. Eh, whatever floats his boat. I managed to get the soap thing down, by just taking out a couple screws. I painted, hung a picture er, window, put up some curtains, scraped some grout, put in a new toilet paper holder, and towel bar, caulked around the bathtub, and it looks so much better. Yes, I scraped grout. For some reason someone not in their right mind decided to put down new grout in the tile without taking the old grout out. Therefore, the new grout kept chipping out making the floor look awful. So, I decided that there was no reason for the new grout to be there when the old stuff looked better anyways, so I got down on the floor with a putty knife, and an hour later, we had no new grout. Here is our after picture-


The red thing on the counter is there for Christmas, but in general, this is what it'll look like. I'm thinking there needs to be a picture or something above the toilet. I'll have to go through my stash of pictures in the closet and see if I can find something that works.


No more hand dryer! Instead there's this old window that I picked up at a thrift store. It already had a mirror in it, which I thought was pretty nifty, so I just painted, distressed slightly, and put in our picture of the wild horses on the beach at Cumberland Island. Josh and I went to Cumberland Island for a camping trip with our youth group while we were "dating" and we got this picture. Now I finally have the perfect place to put it. Here's a close up of my window.


I thought the window needed a little somethin', so I put the little curlycue doo-hickies down at the bottom corner. That's my limited painting abilities, right there. So anyways, that's our bathroom until phase 2 is done. Adios!